Overview
This tutorial provides instructions including shell commands, a step-by-step guide and additional resources at the bottom of this page. There are many different versions of Linux (and Unix) and PHP installation will vary from OS to OS. If you have never worked with Linux or command line programs before it may feel challenging at first, however there are a lot of great resources and tutorials online so if you get stuck simply search the internet for additional resources.
Connecting to Linux
If you are connecting to a Linux Could Server from either Windows or macOS there are many programs that you can use. You may want to start with guides from your web host on how to get connected. If you have a Mac [ssh] is built-in to terminal so you can get connected without having to install anything. Here are some resources for connecting to Linux.
Connecting from Windows
Connecting from Mac
Quick Reference Code
This section shows several different installation options for Linux using shell (terminal / command-prompt). If you are familiar with using shell and are installing on one of the listed OS’s you can use this quick reference. These instructions currently provide an overview of the initial installation. Depending on your OS you may want install additional Apache extensions to update various config files.
Quick Setup
# A bash script is available for a quick setup of Apache or nginx, PHP, and
# FastSitePHP with a Starter Site. This script works for a full setup on a
# default OS when nothing is installed.

# This script is safe to run multiple times because it checks for if programs
# such php are already installed, and prompts before overwriting an existing site.

# Supported Operating Systems (more will be added in the future):
#   Ubuntu 22.04 LTS
#   Ubuntu 20.04 LTS
#   Ubuntu 18.04 LTS
#   Ubuntu 16.04 LTS

# Confirmed Cloud Enviroments:
#   [Amazon AWS Lightsail] with user [ubuntu]
#   [DigitalOcean] with user [root]

wget https://www.fastsitephp.com/downloads/create-fast-site.sh
sudo bash create-fast-site.sh

# When you run [create-fast-site.sh] you will be prompted to select the Web Server
# (either Apache or ngninx) or you can run with the following options:

# For Apache
sudo bash create-fast-site.sh -a

# For nginx
sudo bash create-fast-site.sh -n
Apache and PHP Installation on Ubuntu (Detailed)
# Update the [apt] Package Manager List with [update]
sudo apt update
# The [upgrade] is not required but recommend (however, it takes many minutes)
sudo apt upgrade

# Install Apache and PHP
sudo apt install apache2 php

# Enable PHP for Apache
sudo apt install libapache2-mod-php

# An alternative command version exists to install Apache, MySQL and PHP.
# Depending on the version of the command you will be prompted to
# either provide a password or set one up later for MySQL.
#
# sudo apt install lamp-server^

# Add PHP Extensions. A large number of extensions exist and the
# installed PHP version number needs to be included. The extensions
# below are needed for all FastSitePHP common features to work and
# for all Unit Tests to succeed, however they are not required
# in order to use FastSitePHP.
sudo apt install php7.2-sqlite php7.2-gd php7.2-bc php7.2-simplexml

# The zip extension is required in order for the FastSitePHP
# install script to run.
sudo apt install php7.2-zip

# Optional - Enable a Fallback page so that [index.php]
# does not show in the URL.
sudo nano /etc/apache2/apache2.conf
# Scroll through the file and look for the line:
#    <Directory /var/www/>
# Under it add the line:
#    FallbackResource /index.php
# Save using:
#    {control+s} -> {control+x}
#    or {control+x} -> {y} -> {enter}

# Optional - Enable Gzip Compression for JSON Responses
#   (This is not enabled by default on Apache)
sudo nano /etc/apache2/mods-available/deflate.conf
# Add the following under similar commands:
#       AddOutputFilterByType DEFLATE application/json

# Restart Apache
sudo service apache2 restart

# Set Permissions
# This assumes that the user [ubuntu] exists and
# is used to create and update files on the site.
sudo adduser ubuntu www-data
sudo chown ubuntu:www-data -R /var/www
sudo chmod 0775 -R /var/www

# Create and view a PHP test file
cd /var/www/html
echo "<?php phpinfo(); ?>" | sudo tee phpinfo.php
# http://your-server.example.com/phpinfo.php

# After you view the [phpinfo.php] link it's a good idea to delete it:
sudo rm phpinfo.php

# Bonus! - Install the FastSitePHP Starter Site

# Navigate to your home directory and download the Starter Site
# This is a small download (~67 kb)
cd ~
wget https://github.com/fastsitephp/starter-site/archive/master.zip
sudo apt install unzip
unzip master.zip

# Copy Files
cp -r ~/starter-site-master/app /var/www/app
cp -r ~/starter-site-master/app_data /var/www/app_data
cp -r ~/starter-site-master/scripts /var/www/scripts
cp -r ~/starter-site-master/public/. /var/www/html
ls /var/www
ls -la /var/www/html

# Install FastSitePHP (~470 kb) and Dependencies (~20 - 40 kb)
php /var/www/scripts/install.php

# Delete files that are not needed including the Apache default page
# The [.htaccess] file being deleted is a version for local development
# that is copied from the starter site (it's not needed for production).
sudo rm /var/www/html/.htaccess
sudo rm /var/www/html/Web.config
sudo rm /var/www/html/index.html

# Remove the downloaded files
rm -r ~/starter-site-master
rm master.zip
ls ~

# View your site
# http://your-server.example.com/

# Optional - Unit Testing
# This will test the Framework from the server that you are running on.
# Unit tests are designed to be tested directly on a web server.
# This helps confirm which features are supported in your environment
# based on your server config. Note - If you are using nginx as the
# webserver then additional setup will likely be required in the config
# files in order for the unit tests to run.
cd ~
wget https://github.com/fastsitephp/fastsitephp/archive/master.zip
unzip master.zip
cp -r ~/fastsitephp-master/tests /var/www/html/tests

# Run and Verify all Unit Tests
#     http://{host}/tests/index.htm
#
# If desired turn off certain tests by editing the HTML file:
#   runTimeConsumingTasks = false
#   runTestsWithRSA = false
#   etc
# sudo nano /var/www/html/tests/index.htm
#
# Delete Unit Tests and downloaded files after running
sudo rm -R /var/www/html/tests
sudo rm -R ~/fastsitephp-master
rm master.zip
Apache and PHP Installation on Red Hat, CentoOS, Fedora
# Update the Package Manager's List
sudo yum update –y

# Optional install [vim-common] for hex command [xxd] support.
# This is required if using FastSitePHP or the included shell
# script for file encryption.
sudo yum install vim-common

# Install Apache and PHP
sudo su
yum install httpd
yum install php
apachectl start

# Various Linux OS's including Red Hat Enterprise Edition and CoreOS
# use Security-Enhanced Linux (SELinux) by default. If used then Apache
# and PHP will be blocked from writing files. To grant file write access
# on a folder to Apache run the following (modify the dir path
# '/var/www/app_data' as needed for your environment.
sudo semanage fcontext -a -t httpd_sys_rw_content_t "/var/www/app_data(/.*)?"
sudo restorecon -Rv /var/www/app_data
sudo chown apache:apache -R /var/www/app_data/*
Apache and PHP Installation on FreeBSD
# [sudo] may not always be available so you can use [su -]
su -

# Install and start Apache
pkg install apache24
sysrc apache24_enable=yes
service apache24 start

# View Site
# http://your-server.example.com/

# Install PHP by Version (php73 = 7.3)
pkg install mod_php73

# Use PHP version number and install optional packages.
# By default FreeBSD installs fewer extensions than other systems.
# FastSitePHP will work with the base install for routing and core
# features, however to use all features of FastSitePHP and pass all
# Unit Tests for the Framework many optional extensions are needed.
pkg install php73-json php73-filter php73-hash php73-ctype
pkg install php73-openssl php73-mbstring php73-zip
pkg install php73-xml php73-bcmath
pkg install php73-pdo php73-pdo_sqlite
pkg install php73-simplexml php73-xmlwriter
pkg install php73-session

# Create new file:
vi /usr/local/etc/apache24/Includes/php.conf
# enter [i] for Insert then copy/paste or type the following:
<IfModule dir_module>
    DirectoryIndex index.php index.html
    <FilesMatch "\.php$">
        SetHandler application/x-httpd-php
    </FilesMatch>
    <FilesMatch "\.phps$">
        SetHandler application/x-httpd-php-source
    </FilesMatch>
</IfModule>
# Save using:
# {esc} :wq

# Make sure the file looks correct
cat /usr/local/etc/apache24/Includes/php.conf

# Copy [php.ini] and create a Test [phpinfo.php] file
cp /usr/local/etc/php.ini-production /usr/local/etc/php.ini
cd /usr/local/www/apache24/data
echo "<?php echo phpinfo(); ?>" | tee phpinfo.php
service apache24 restart
# http://your-server.example.com/phpinfo.php

# Optional - Install [vim-console] which contains [xxd]
# that is used for large file encryption.
pkg install vim-console

# Optional - Set file permissions so you can copy files
chown -R ec2-user:www /usr/local/www
chmod 2775 /usr/local/www
find /usr/local/www -type d -exec chmod 2775 {} \;
find /usr/local/www -type f -exec chmod 0664 {} \;

# Install FastSitePHP Starter Site
cd ~
fetch https://github.com/fastsitephp/starter-site/archive/master.zip
unzip master.zip

# Copy Files
cp -r ~/starter-site-master/app /usr/local/www/apache24/app
cp -r ~/starter-site-master/app_data /usr/local/www/apache24/app_data
cp -r ~/starter-site-master/scripts /usr/local/www/apache24/scripts
cp -r ~/starter-site-master/public/. /usr/local/www/apache24/data
ls /usr/local/www/apache24
ls -la /usr/local/www/apache24/data

# Install FastSitePHP (~470 kb) and Dependencies (~20 - 40 kb)
php /usr/local/www/apache24/scripts/install.php

# Delete files that are not needed including the Apache default page
# The [.htaccess] file being deleted is a version for local development
# that is copied from the starter site (it's not needed for production).
rm /usr/local/www/apache24/data/.htaccess
rm /usr/local/www/apache24/data/Web.config
rm /usr/local/www/apache24/data/index.html
rm /usr/local/www/apache24/data/phpinfo.php

# Remove the downloaded files
rm -r ~/starter-site-master
rm master.zip

# Optional - Run Unit Tests
cd ~
fetch https://github.com/fastsitephp/fastsitephp/archive/master.zip
unzip master.zip
cp -r ~/fastsitephp-master/tests /usr/local/www/apache24/data/tests

# Run and Verify all Unit Tests
#     http://{host}/tests/index.htm

# Delete Unit Tests and downloaded files after running
sudo rm -R /usr/local/www/apache24/data/tests
sudo rm -R ~/fastsitephp-master
rm ~/master.zip
Step by Step Example
This example was performed on Ubuntu using an Amazon AWS Lightsail Server and commands were typed into the supplied browser based terminal.
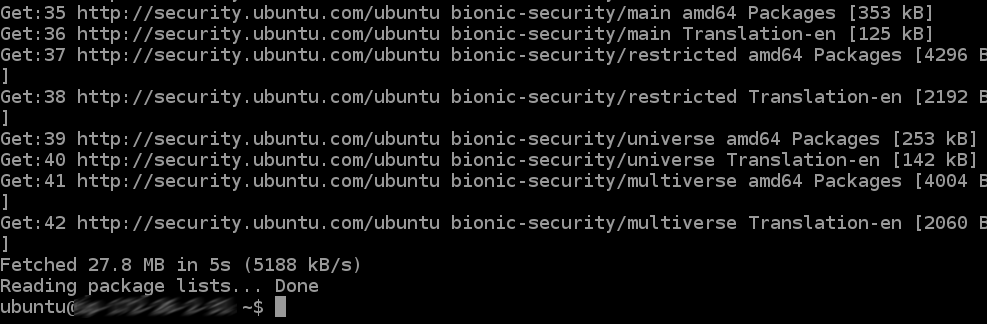
Update the Advanced Package Tool (APT) List
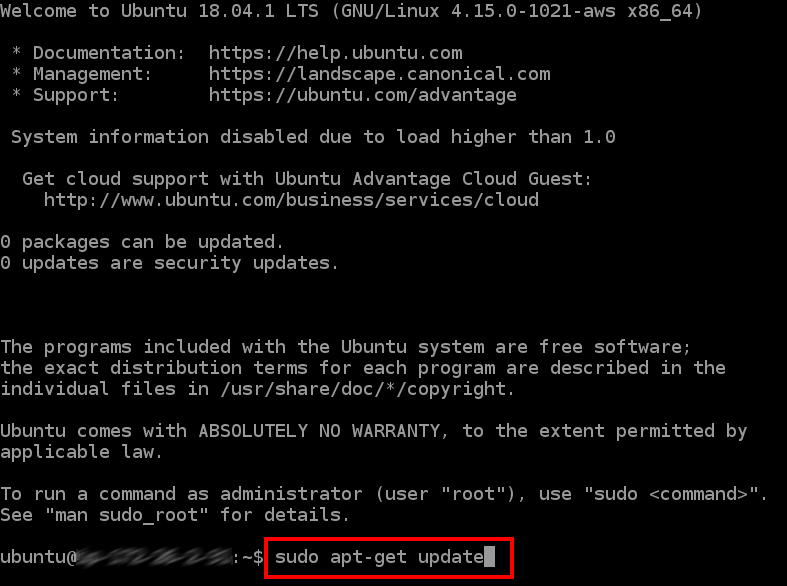
The update process outputs log info as it runs and should complete quickly. Once it is updated you’ll be able to type on the terminal again.
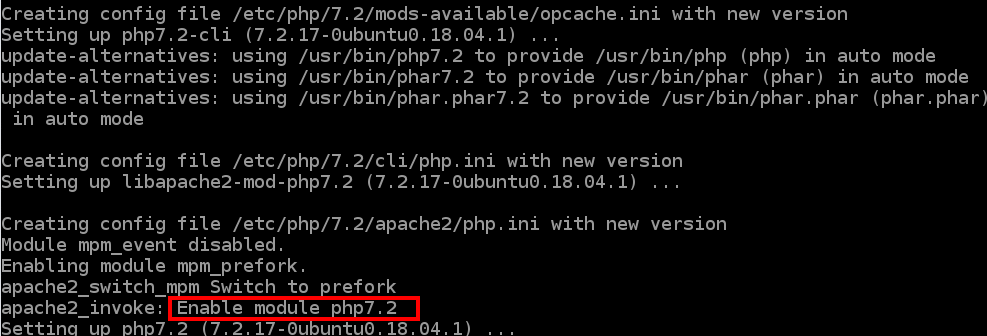
Install Apache, PHP, and then enable PHP for Apache and PHP. Detailed log info will be displayed when each command runs.
sudo apt install apache2sudo apt install phpsudo apt install libapache2-mod-php

Determine the installed PHP Version; it will be clearly available from the installer log. This can be used to optionally install various extensions. Example: sudo apt install php7.2-sqlite php7.2-gd php7.2-bc php7.2-simplexml
Optional - Enable a Fallback page so that [index.php] does not show in the URL. Edit the Apache Config file using: sudo nano /etc/apache2/apache2.conf. The file will then show in the nano editor.

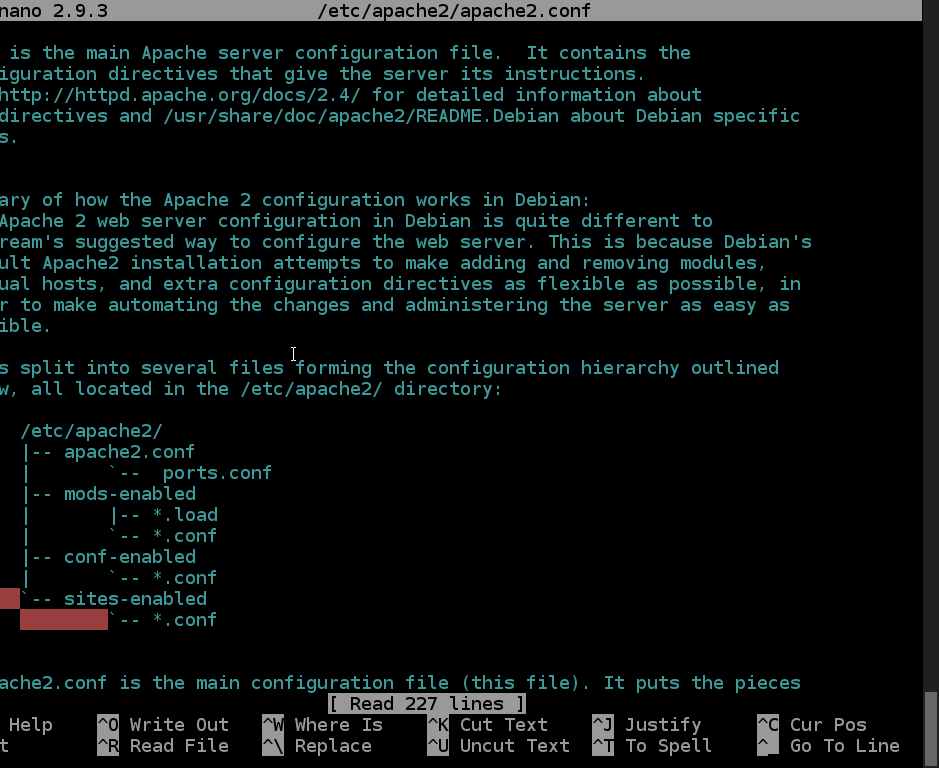
Scroll through the file and look for line: <Directory /var/www/>. Add the line FallbackResource /index.php under it. In this example CGIPassAuth On is also added so that the HTTP Request Header [Authorization] is made available to PHP using $_SERVER['HTTP_AUTHORIZATION']; however it is not required when using the FastSitePHP Request Object. The nano exit/save/etc menus will show at the bottom of the screen.
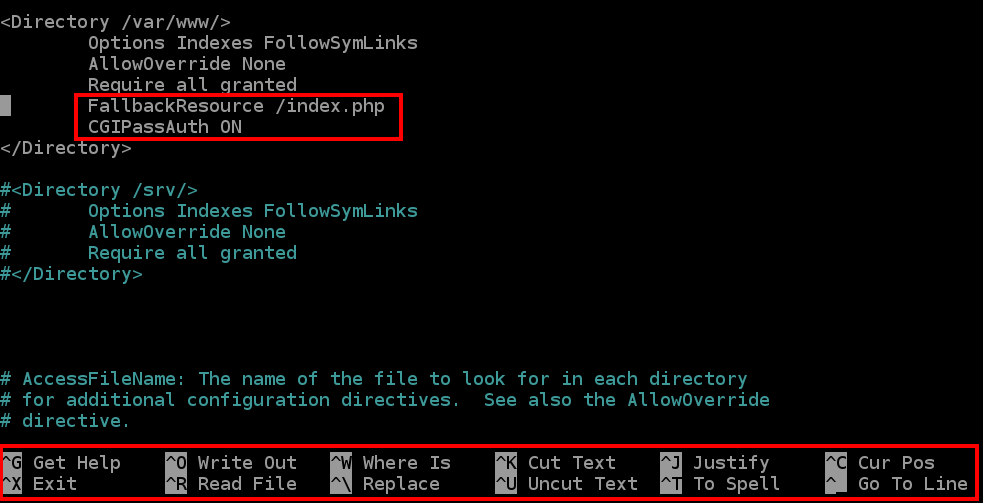
Save the file using {control}+x -> y -> {enter}


Restart Apache using sudo service apache2 restart

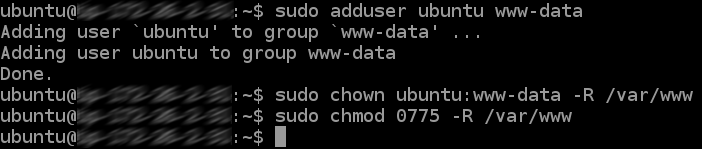
Set User Permissions so that web files can be modified by the user you login with.
sudo adduser ubuntu www-datasudo chown ubuntu:www-data -R /var/wwwsudo chmod 0775 -R /var/www
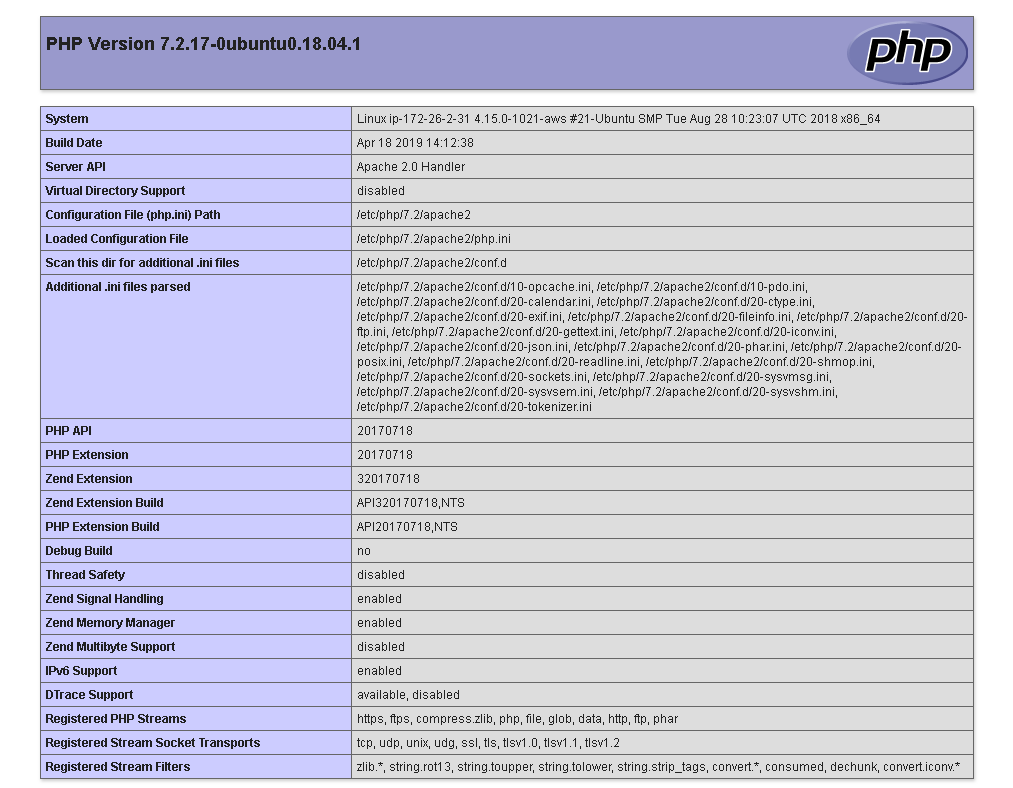
Create a [phpinfo.php] file to confirm that PHP works.
cd /var/www/htmlecho "<?php phpinfo(); ?>" | sudo tee phpinfo.php

Use the Public IP of the Server to view the default Apache page in a web browser.
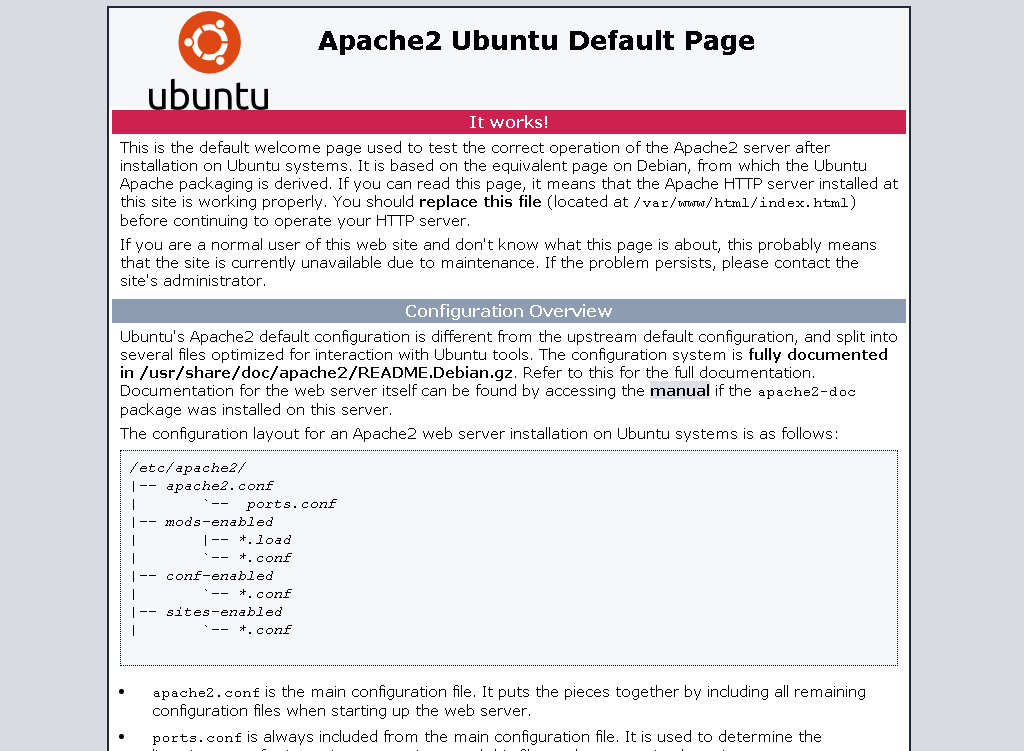
Confirm that PHP works and see detailed installation and config info using the page [phpinfo.php].