File Encryption using the compatible Bash Script [encrypt.sh]
Overview
FastSitePHP includes the ability to encrypt files using both a PHP Class and a compatible Bash Script. Bash is the default shell on many versions of Linux and on macOS; it is also widely available on other Unix Like OS’s such as the BSD's (FreeBSD, NetBSD, OpenBSD, DragonFlyBSD etc). Bash can also run on Windows using the Windows Subsystem for Linux or third-party tools.
This page shows how to use the bash script and provides details on how it works.
Screenshots on this page were created on Mac using SSH and Terminal to connect to an Amazon Web Services (AWS) Lightsail Servers. The IP addresses and any server info shown on the screenshots are from temporary servers that no longer exists.
File Encryption API and Bash Script
Running the Script
To run using Bash run the command bash encrypt.sh from your shell or terminal program or to run directly run the command ./encrypt.sh, but you first need to make it executable by setting the permissions running chmod +x encrypt.sh however this typically won't be required.
When you run the script without any options or using the ./encrypt.sh -h Help Option you will see info for the command, usage, options, and examples.
![Bash [encrypt.sh] Help Screen](https://dydn9njgevbmp.cloudfront.net/img/docs/encrypt_sh_bash/00_Encrypt_Help.20200628.png)
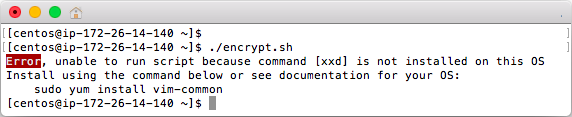
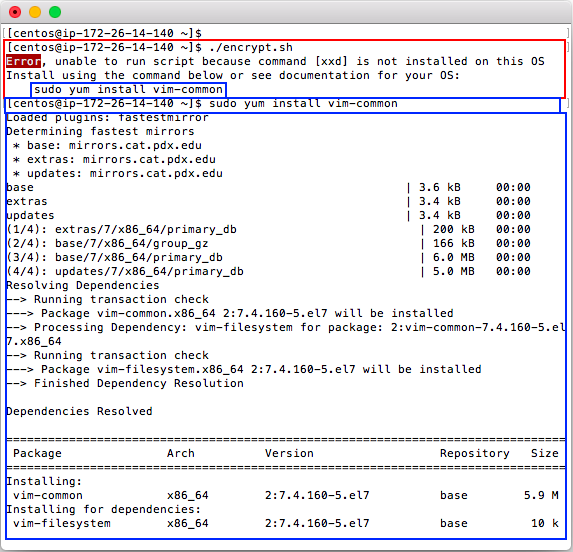
This script has no dependencies other than commands that are expected to be installed on most Linux OS's. The actual commands for encryption and decryption work with FreeBSD, however FreeBSD does not include Bash by default. Red Hat, CentoOS, Fedora and some Linux installs won't have the required command [xxd] installed by default so this script provides a warning and info on how to install if needed.

Encrypting and Decrypting Files
The Generate Key Option ./encrypt.sh -g will generate a secure and unique hex key for encrypting and decrypting. The key can be used with this Bash Script and also with FastSitePHP's encryption classes [Security\Crypto\Encryption] and [Security\Crypto\FileEncryption]. You can save a key to a file by running ./encrypt.sh -g > encryption.key.
![Generate a Key using [encrypt.sh]](https://dydn9njgevbmp.cloudfront.net/img/docs/encrypt_sh_bash/02_Generate_Key.png)
To encrypt a file use the -e option and specify the {input-file} (file to encrypt) and {output-file} (encrypted file). You can use a -k Key, -p Password, or leave the parameter blank in order to be prompted for a password.
./encrypt.sh -e -i <input-file> -o <output-file> -k <key>./encrypt.sh -e -i <input-file> -o <output-file> -p <password>./encrypt.sh -e -i <input-file> -o <output-file>
To decrypt a file use the -d option and specify the {input-file} (encrypted file) and {output-file} (decrypted file).
./encrypt.sh -d -i <input-file> -o <output-file> -k <key>./encrypt.sh -d -i <input-file> -o <output-file> -p <password>./encrypt.sh -d -i <input-file> -o <output-file>
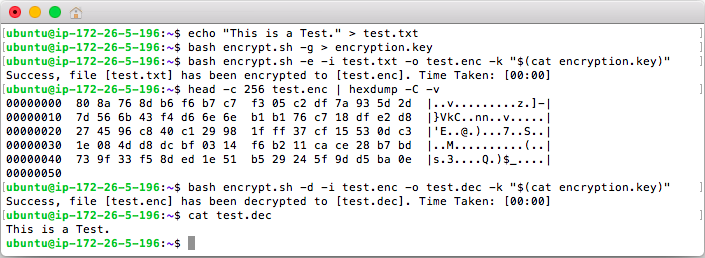
Encrypted files are un-readable so the command head -c 256 test.enc | hexdump -C -v is used below to show the file bytes using a hex viewer. Also in the screenshot the key is read from a file and passed to the command using "$(cat encryption.key)".
In the example below the file [test.txt] is encrypted to [test.enc], and then [test.enc] is decrypted to [test.dec].
This screenshot shows an example of decrypting a file using a password that is entered hidden in the terminal. The option -p is available for using passwords however it may result in your password being saved to shell history so if you are using this script with a password leaving the option blank is recommended. If using a Password instead of a Key expect an extra 1 to 3 seconds of processing time per file.

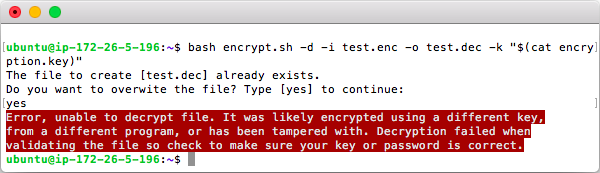
The script is safe to run and prompts you before overwriting any files. Additionally if there is an error or the file cannot be decrypted you will see a clear error message.
On most systems you can install the command globally using sudo mv encrypt.sh /usr/local/bin/encrypt. You can then simply use the command encrypt from any place on your shell/terminal.
![Install [encrypt.sh] Globally](https://dydn9njgevbmp.cloudfront.net/img/docs/encrypt_sh_bash/06_Install_Global_Command.png)
Unit Testing
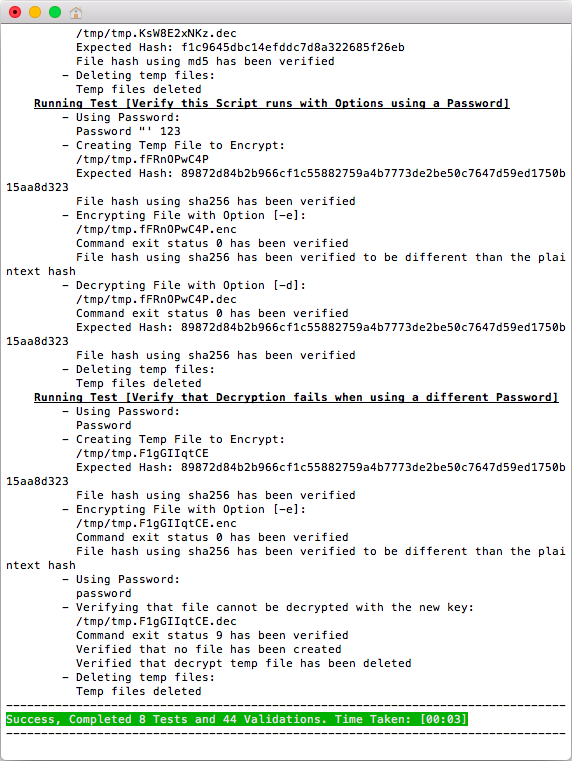
This script has the ability to run unit tests using the option ./encrypt.sh -t. Unit Testing helps verify that your system works properly.
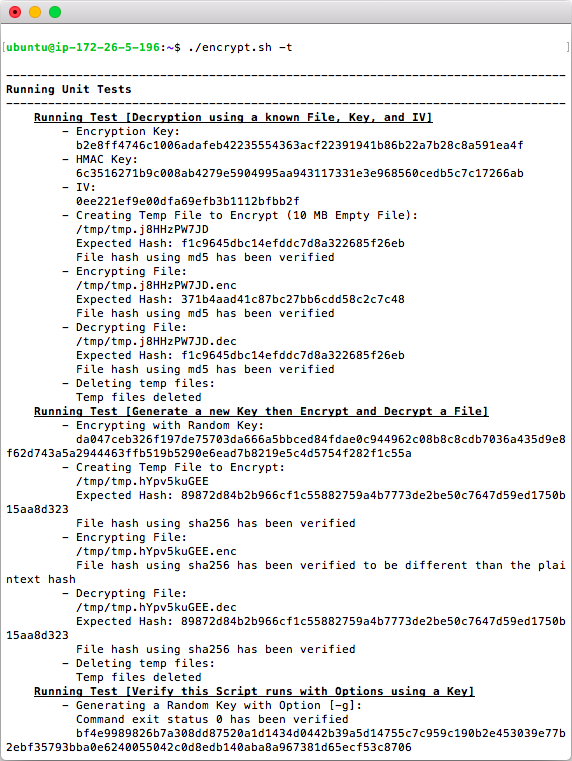
Unit Tests typically run between 3 to 20 seconds depending on the speed of the computer. Once complete you will see the result.
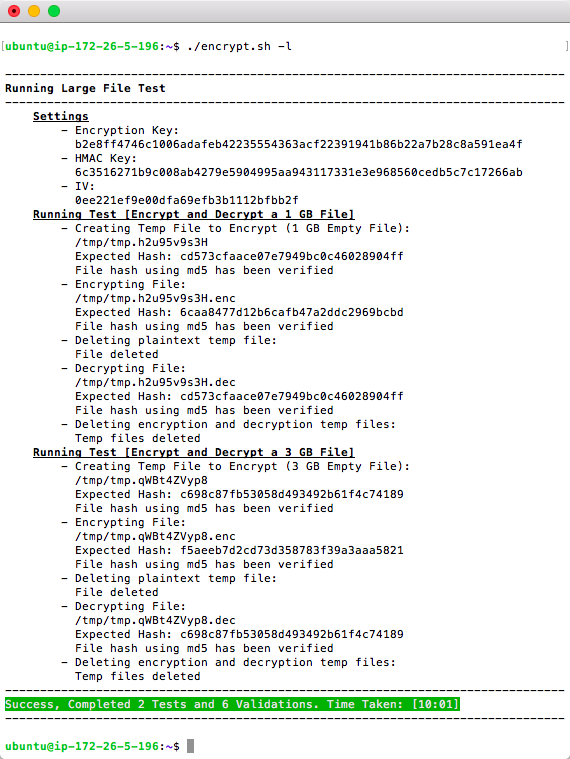
The option ./encrypt.sh -l can be used to verify that large file encryption is supported on your system. This option will create files of 1 GB and 3 GB in size and requires at least 9 GB of disk space. The -l option may take anywhere from several minutes to over 30 minutes depending on your system and disk speed. If the core Unit Tests -t work on your system then the large file test is also expected to work on almost all systems. It would fail if your server does not allow files larger than 2 GB to be created (32-bit max size); most 32-bit instances of Linux will allow files larger than 2 GB.
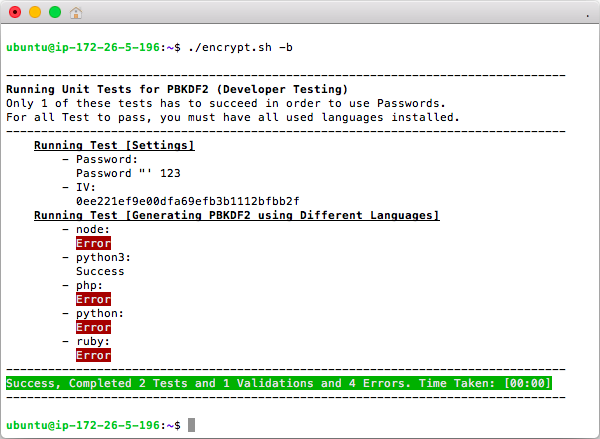
When using Passwords, Encryption Keys are generated using PBKDF2 (Password-Based Key Derivation Function 2). Bash/Shell does not provide built-in support for PBKDF2 so one of the following languages is used to derive the password [node, python3, php, python, ruby]. The ./encrypt.sh -b option can be used to see which languages are used and working for PBKDF2; only 1 language is required to be installed in order to use passwords and most systems will have at least one of these languages.
Encryption and Decryption Details
Internally the script uses [openssl] to perform both encryption and HMAC authentication. [openssl] is included with all Linux and Unix computers. The code below shows step by step the commands needed to perform encryption and decryption. The bash script itself is much larger (~1,500 lines of code) because it has a lot of safety checks, includes help, validation, unit tests, and supports passwords.
Full understanding of these commands requires good knowledge of encryption terms and how encryption works, however this code includes many comments and can be simply copied step by step to see how it works.
# -----------------------------------
# Create a Test File
# -----------------------------------

# First create an empty 10 MB file named "crypto_test_10mb" for testing.
# Mac uses [mkfile] while Linux or Unix will use one of the other commands.
# [dd] is included for documentation purposes, however, it is very slow for this
# and in general [dd], often nick-named "disk destroyer", should be used with caution.
mkfile -n 10m crypto_test_10mb
xfs_mkfile 10m crypto_test_10mb
fallocate -l 10m crypto_test_10mb
truncate -s 10m crypto_test_10mb
dd if=/dev/zero of=crypto_test_10mb bs=10m count=1

# Calculate a MD5 Hash. Mac and FreeBSD use [md5] while Linux will use [md5sum].
# Hash: f1c9645dbc14efddc7d8a322685f26eb
md5 crypto_test_10mb
md5sum crypto_test_10mb

# View start of file
head -c 256 crypto_test_10mb | hexdump -C -v

# ----------------------------------------------
# Generate a Key for Encryption and Decryption
# ----------------------------------------------

# Use the System's CSPRNG (Cryptographically secure pseudorandom number generator)
# to generate a key that is 64-bytes in length. The first 32-bytes (256-bits) will
# be used for encryption and the last 32-bytes will be used for authentication.
# Each time this command runs a different key will be generated.
#
# For this example we will use the key:
# b2e8ff4746c1006adafeb42235554363acf22391941b86b22a7b28c8a591ea4f6c3516271b9c008ab4279e5904995aa943117331e3e968560cedb5c7c17266ab
#
# IMPORTANT - Do no copy and use the key for your applications,
# instead generate a new key whenever you need one.
xxd -l 64 -c 64 -p /dev/urandom

# If the above command does not work first run
# one of the following commands and try again:
#
# Linux (Red Hat, CentoOS, Fedora, etc)
sudo yum install vim-common
# FreeBSD
su -
pkg install vim-console

# If using FreeBSD with the root account you will need to re-create
# the empty 10 MB file under root:
#
# truncate -s 10m crypto_test_10mb

# A key can be assigned to a variable [key] and
# then split into the 2 needed keys. Example:
key=$(xxd -l 64 -c 64 -p /dev/urandom)
enc_key=${key:0:64}
hmac_key=${key:64}
#
# Or for FreeBSD if the above syntax is not supported
set key = `xxd -l 64 -c 64 -p /dev/urandom`
set enc_key = `echo $key | cut -c1-64`
set hmac_key = `echo $key | cut -c65-128`

# Example Result:
# enc_key  = b2e8ff4746c1006adafeb42235554363acf22391941b86b22a7b28c8a591ea4f
# hmac_key = 6c3516271b9c008ab4279e5904995aa943117331e3e968560cedb5c7c17266ab
echo $enc_key
echo $hmac_key

# -----------------------------------
# Encrypt
# -----------------------------------

# Generate the Initialization Vector (IV).
# The IV is 16 secure random bytes which is the IV size for 'aes-256-cbc'.
# The value changes every time the function is called and when used properly
# as is done with [encrypt.sh]; it results in the encrypted text being different
# each time the data is encrypted even though the same key is used.
xxd -l 16 -p /dev/urandom
# Value for this Demo: 0ee221ef9e00dfa69efb3b1112bfbb2f

# Encrypt (creates a new file "crypto_test_10mb.enc")
# The algorithm 'aes-256-cbc' is used, some systems also support the secure
# algorithm 'aes-256-ctr' however it will not work on all systems which is
# why [encrypt.sh] only supports 'aes-256-cbc'.
openssl enc -aes-256-cbc \
    -in crypto_test_10mb \
    -out crypto_test_10mb.enc \
    -iv 0ee221ef9e00dfa69efb3b1112bfbb2f \
    -K b2e8ff4746c1006adafeb42235554363acf22391941b86b22a7b28c8a591ea4f

# Hash: afac5edb3cda97a31f4a67bc3c34bf13
md5 crypto_test_10mb.enc
md5sum crypto_test_10mb.enc

# View end of the file
tail -c 32 crypto_test_10mb.enc | hexdump -C -v

# Append IV to the end of the file.
# Typically in secure applications and sites the IV is saved with the
# encrypted data while only the key is required to be secret.
echo 0ee221ef9e00dfa69efb3b1112bfbb2f | xxd -r -p >> crypto_test_10mb.enc

# Now view the end of the file after adding IV
tail -c 32 crypto_test_10mb.enc | hexdump -C -v

# Hash: d257ac3640eb35d82591facd8c7ddb25
md5 crypto_test_10mb.enc
md5sum crypto_test_10mb.enc

# First view what the HMAC would be:
# Result: 2d525a248488d6551bbd87db93f5b8efd38e35848c517cf66c2aed7583ea8744
cat crypto_test_10mb.enc \
    | openssl dgst \
        -sha256 \
        -mac hmac \
        -macopt hexkey:6c3516271b9c008ab4279e5904995aa943117331e3e968560cedb5c7c17266ab \
        -binary \
    | xxd -l 32 -c 32 -p

# Calculate and append HMAC to the end of the file.
# The HMAC is read and used during decryption to authenticate
# that the file has not been tampered with.
cat crypto_test_10mb.enc \
    | openssl dgst \
        -sha256 \
        -mac hmac \
        -macopt hexkey:6c3516271b9c008ab4279e5904995aa943117331e3e968560cedb5c7c17266ab \
        -binary \
    >> crypto_test_10mb.enc

# Hash: 371b4aad41c87bc27bb6cdd58c2c7c48
md5 crypto_test_10mb.enc
md5sum crypto_test_10mb.enc

# View the appended IV and HMAC
tail -c 64 crypto_test_10mb.enc | hexdump -C -v

# -----------------------------------
# Decrypt
# -----------------------------------

# Copy the original encrypted file so that it does not get modified
cp crypto_test_10mb.enc crypto_test_10mb.enc.tmp

# Hash: 371b4aad41c87bc27bb6cdd58c2c7c48
md5 crypto_test_10mb.enc.tmp
md5sum crypto_test_10mb.enc.tmp

# Get the HMAC from end of the file
# Result: 2d525a248488d6551bbd87db93f5b8efd38e35848c517cf66c2aed7583ea8744
tail -c 32 crypto_test_10mb.enc.tmp | xxd -l 32 -c 32 -p

# For later comparison we'll also save it to a variable:
file_hmac=$(tail -c 32 crypto_test_10mb.enc.tmp | xxd -l 32 -c 32 -p)
echo $file_hmac
#
# FreeBSD
set file_hmac = `tail -c 32 crypto_test_10mb.enc.tmp | xxd -l 32 -c 32 -p`
echo $file_hmac

# Truncate the HMAC from end of the file
#
# Truncating bytes from the end of a file happens almost instantly with the
# correct commands while removing bytes from the beginning of a file would
# require the entire file to be copied which is why the IV and HMAC are appended
# to the end of the file rather than the beginning of the file. On Linux and most
# Unix computers the [truncate] command will exist while on macOS it will not
# exist unless manually installed so a one-line Ruby script is used.
#
# The program [stat] will have different options depending on the OS.
# The "2>/dev/null ||" causes errors to be ignored and the other option to run.
# In bash "$(( expression ))" is used for math.
#
# Linux and some FreeBSD installs:
truncate -s $(( $(stat -c%s crypto_test_10mb.enc.tmp 2>/dev/null \
    || stat -f%z crypto_test_10mb.enc.tmp) - 32 )) crypto_test_10mb.enc.tmp
#
# Mac:
ruby -e 'File.truncate("crypto_test_10mb.enc.tmp", File.size("crypto_test_10mb.enc.tmp")-32)'
#
# FreeBSD
set length = `stat -f%z crypto_test_10mb.enc.tmp`
set new_length = `expr $length - 32`
truncate -s $new_length crypto_test_10mb.enc.tmp

# Calculate and view the file HMAC after removing it
# Result: 2d525a248488d6551bbd87db93f5b8efd38e35848c517cf66c2aed7583ea8744
cat crypto_test_10mb.enc.tmp \
    | openssl dgst \
        -sha256 \
        -mac hmac \
        -macopt hexkey:6c3516271b9c008ab4279e5904995aa943117331e3e968560cedb5c7c17266ab \
        -binary \
    | xxd -l 32 -c 32 -p

# Also save it to a variable for comparison
calc_hmac=$(cat crypto_test_10mb.enc.tmp \
    | openssl dgst \
        -sha256 \
        -mac hmac \
        -macopt hexkey:6c3516271b9c008ab4279e5904995aa943117331e3e968560cedb5c7c17266ab \
        -binary \
    | xxd -l 32 -c 32 -p)
echo $calc_hmac
#
# FreeBSD
set calc_hmac = `cat crypto_test_10mb.enc.tmp \
    | openssl dgst \
        -sha256 \
        -mac hmac \
        -macopt hexkey:6c3516271b9c008ab4279e5904995aa943117331e3e968560cedb5c7c17266ab \
        -binary \
    | xxd -l 32 -c 32 -p`
echo $calc_hmac

# Verify that the Saved HMAC and Caculated HMAC are Equal.
# IMPORTANT - when comparing hashes in an app or website a time-safe
# compare method would be used in a secure app or site. For example,
# using [PHP:hash_equals()] or [Python:hmac.compare_digest()]. Since we
# are manually typing a simple if statement is used because a time-safe
# compare is not relevant.
[ $file_hmac = $calc_hmac ] && echo 'equal' || echo 'not equal'

# Get the IV from the end of the file
# Result: 0ee221ef9e00dfa69efb3b1112bfbb2f
tail -c 16 crypto_test_10mb.enc.tmp | xxd -l 16 -c 16 -p

# Truncate the IV from end of the file
#
# Linux:
truncate -s $(( $(stat -c%s crypto_test_10mb.enc.tmp 2>/dev/null \
    || stat -f%z crypto_test_10mb.enc.tmp) - 16 )) crypto_test_10mb.enc.tmp
#
# Mac:
ruby -e 'File.truncate("crypto_test_10mb.enc.tmp", File.size("crypto_test_10mb.enc.tmp")-16)'
#
# FreeBSD
set length = `stat -f%z crypto_test_10mb.enc.tmp`
set new_length = `expr $length - 16`
truncate -s $new_length crypto_test_10mb.enc.tmp

# Hash: afac5edb3cda97a31f4a67bc3c34bf13
md5 crypto_test_10mb.enc.tmp
md5sum crypto_test_10mb.enc.tmp

# Decrypt the file using the same key used for encryption
# and the IV that was saved at the end of the file.
# This will create a new file "crypto_test_10mb.dec".
openssl enc -aes-256-cbc \
    -d \
    -in crypto_test_10mb.enc.tmp \
    -out crypto_test_10mb.dec \
    -iv 0ee221ef9e00dfa69efb3b1112bfbb2f \
    -K b2e8ff4746c1006adafeb42235554363acf22391941b86b22a7b28c8a591ea4f

# Hash: f1c9645dbc14efddc7d8a322685f26eb
md5 crypto_test_10mb.dec
md5sum crypto_test_10mb.dec

# View the last 256 bytes of the file using a hex viewer.
# They will be all null bytes (ASCII 0 / Hex 00).
tail -c 256 crypto_test_10mb.dec | hexdump -C -v

# If using [encrypt.sh] the encrypted file can be decrypted using the following commands:
key=b2e8ff4746c1006adafeb42235554363acf22391941b86b22a7b28c8a591ea4f6c3516271b9c008ab4279e5904995aa943117331e3e968560cedb5c7c17266ab
./encrypt.sh -d -i crypto_test_10mb.enc -o crypto_test_10mb.dec -k "$key"

# View files and then delete the created "crypto*" files
ls crypto*
rm crypto*
ls